Zemanta Delivers Free Graphics, Keywords and More to Your Browser

March 29th, 2008 WordPlay Posted in Blogging, Free Graphics, Free Images, Free Online Tools, Free Photos, Free Software, Reviews, Tips and Tools, Writing Tips and Tools 6 Comments »

Zemanta GalleryI recently read about Zemanta’s ability to deliver free graphics and other resources right to your browser and thought, yeah, that might be cool. But then I saw it in action and I truly got excited.

For those who haven’t heard about it, Zemanta is a plugin for Mozilla Firefox 2 and 3 that can be used with WordPress.org, Blogger or Typepad. (This is yet another reason to use the vastly superior Firefox browser. A version of Zemanta also is in the works for Internet Explorer though. You can e-mail Zemanta at info [@] zemanta.com if you’d like to become an IE beta tester.)

What exactly does Zemanta do? Well, it’s hard to condense into a few words. I’ve seen it described as a “content suggestion engine” and a “semantic layer” but I think it’s best to let the folks at Zemanta explain their virtues themselves in this excerpt from their Web site:

* Pleasure: It’s fun to see your words paired with great links and pix
* Content: Pictures, links, articles and tags
* Convenience: No more trolling the web for content for your posts
* Traffic: Links to recent blog posts frequently result in return traffic

Still don’t know what the heck it is? Check out the photos below that show Zemanta in action. I took these screen shots this morning as I prepared a post for my movie trivia blog, Tricky Movie Trivia. I figured, why not go for some shameless self-promotion while I try to enlighten you about this cool new plugin?

So, here we go:

Zemanta places an interface to the right of the window where you enter your blog post. In this interface is a gallery of photos that are either in the public domain or are tagged as “Non-free, could qualify as fair use.” The former option leaves it up to you to check on usage permissions.

Zemanta sample 2

The more you write, the more Zemanta tweaks its image offerings to match your copy. In my case, the more I wrote about Bette Davis and All About Eve, the more photos of both I was shown as options.

There were some great photos, but in the end I opted for one that wouldn’t have been my first choice because it was the only one in the public domain. All I had to do to select it was click on it and Zemanta immediately placed it in the upper right corner of my post with the photo source (Wikipedia) underneath it. This feature alone made me fall in love with Zemanta. I use graphics/photos in my posts all the time and I’ve never known how to get the image credits positioned underneath them without creating a table.

There are, however, several minor negative aspects to the photo feature. One is that you can only use one image. If you try to insert a second image, no matter where you place your cursor Zemanta always erases the first photo you inserted and replaces it with the new one. The other downside is that you have no way to control which nine images are offered up.

In the case of All About Eve, I was lucky because that subject lent itself to photography. While writing this post, however, I got an odd assortment of images that kept changing as I wrote. I started with six photos of Bette Davis, screen shots of the Blogger and WordPress login pages, and a very large Internet Explorer icon. By the time I was done, I had one Bette Davis photo, Firefox and IE logos, and screen shots of various Web pages having to do with random subjects in this story. But Zemanta is new and expanding, so I expect to see the selection widen with time. And how can I complain anyway? I was able to find an appropriate photo for my movie review without even opening another browser window. As a bonus, I also found an image for another Bette Davis movie I had already reviewed.

Related articles

Zemanta also presented a list of related articles in its “Articles” section, which is situated underneath the photo “Gallery.” Although I didn’t opt to use one in my All About Eve post, I did choose an article for this post from about Zemanta from techcrunch.com, which you can see at the bottom of the page. Like the photo described above, the article link and its surrounding border and text were inserted with one click.

Links and keywords

Zemanta also presents “Links” and “Tags” suggestions underneath the post. Similar to the related articles links in the “Articles”section, if you click on any of the words Zemanta presents in the “Links” section, the words will automatically be linked to the source from your blog post. For the movie review, the resources were Wikipedia and the Internet Movie Database, but I understand from the Zemanta FAQ that these resources will be greatly expanded in the future, along with the photo sources.

Zemanta sample 3

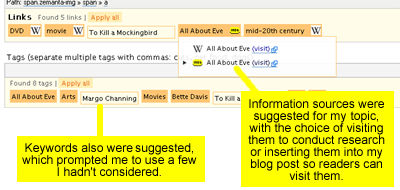
In the “Tags” section, keywords were suggested. I found this helpful, as I hadn’t considered some of those that were listed. Although you obviously can’t see the impact Zemanta had on my blog’s keywords in the screen shot of the final post below, and I didn’t use any of their text links, you can see the tidy way in which the source was placed under the photo. In my opinion, it gives the post a professional look. Even better, it was incredibly simple to do.

Tricky Movie Trivia

Additional notes

Zemanta places a small icon at the bottom of any post that has been “Zemified” but you can remove it if you’d like. Personally, I found their plugin to be so helpful, I don’t mind giving them credit.

To read their FAQ, which explains more about where Zemanta gets its resources and how it plans to expand the service in the future, click here.

To download Zemanta, click here.

You might also be interested in these other resources on WordPlay:


Free Graphics: Fun Badges and Seals for Your Blog

March 22nd, 2008 WordPlay Posted in Avatars, Blogging, Cartoons, Clip Art, Free Clip Art, Free Graphics, Free Images, Free Online Tools, Free Software, Just For Fun, Make Your Own Clip Art, Reviews, Tips and Tools 12 Comments »

“Badges? We don’t need no stinking badges!”
Blazing Saddles, 1974

Web graphics sample 2Clearly the bandito who uttered that immortal line from Blazing Saddles didn’t have a blog. If he did, he’d be thrilled to have access to these free graphics, which include some pretty cool official-looking badges and seals.

I’m a real advocate of lightening up when it comes to blogging, which is neither rocket science nor the cure for cancer (unless, of course, you actually blog about rocket science or cancer cures). But even if your subject matter is serious, it’s often still appropriate to have a little fun with your content.

The following free Web graphics applications can help you interject a little of that fun into your blog. They allow you to choose your own text and colors to create badges and seals that can be used as icons, to illustrate a blog post or even as part of your blog design.

The Says-It.com Official Badge Generator offers three badge styles: fire, police and sheriff. You can use any colors you can think of, because they have an intuitive HTML hex-code color selector for each component of the badge.

Web graphics sample 1

Web graphics color pickerIf the term “HTML hex-code color selector” intimidates you, don’t worry. As you can see from the image to the right, their color selector only requires that you drag icons to the color you want. For me, playing with the colors was part of the fun; there’s just something humorous about a purple and teal sheriff’s badge.

I played with this tool for hours because it’s like a coloring book for grown-ups. Except when I was done playing, I had a collection of cool usable Web graphics.

The Says-It.com Official Seal Generator is equally fun. I played around with this for my movie trivia blog and ended up with an icon I now use on the home page. Here are some of the designs I came up with:

Web graphics sample 3

The Official Seal Generator uses the same interface and tools as the Official Badge Generator, so once you’ve used one, you’ll know how to use the other. They’re oh-so-easy to use, so as a newly appointed member of the Web Police (and I have the badge to prove it), I command you to go and have fun with these free Web graphics tools!

Update (5-21-08): New designs have been added, so there are now five badge and seven seal designs.

You might also be interested in these other resources:


Picasa Lets You Go Crazy With Photos and Clip Art

January 19th, 2008 carlajc Posted in Avatars, Cartoons, Clip Art, Free Clip Art, Free Online Tools, Free Photos, Free Software, Photography, Tips and Tools 10 Comments »

Picasa collageI don’t know about you, but it seems like no matter how organized I am about filing my free clip art and photos on my computer; the more of it I gather, the harder it is to find things. So I was thrilled when I discovered Picasa.

Why is it so cool? For starters, after you load the Picasa free software, it goes to work capturing every image on your hard drive. It doesn’t move your images; it simply records where they are and displays them in one scrolling window. So a photo I stored on my computer three years ago in a client’s folder and completely forgot suddenly became visible to me. I discovered image after image I didn’t even know was there. And because Picasa displays the folder name where the image is located, you can go right to it on your hard drive.

Picasa screen

Picasa displays all your images in one long, scrolling screen.

Once Picasa has located your photos, it allows you to organize them by deleting or dragging and dropping to another folder. And if you want to get fancy, there are a lot of options.

Picasa basic fixesWhen you click on an image, Picasa brings up an interface that lets you modify it in a number of ways. In addition to cropping, straightening, fixing red eye and more basic functions, it also has an effects screen that creates just about any look you want by just selecting the corresponding icon. You can modify your image to be black and white or sepia-tone, or you can change the focus, saturation and tint, put in a graded background and a lot more. This is a great feature for people who want to modify images but don’t have more complex and expensive image modification software.

Picasa also has another fun feature that creates custom-looking collages (see the top of this page), a contact sheet or a picture grid of all the images you select. Additionally, it has a multi-exposure feature that layers one image over another. This could come in handy when layering a logo or an image with text in it over a photograph or clip art.

And when you’re done playing with the images, just choose one of the buttons at the bottom of the screen to make a Web album, e-mail or upload an image to Blogger, order prints or export.

If you’re wondering why you can upload to Blogger and not WordPress, that’s because, like Blogger, Picasa is yet another property of the great Google empire. But if you’re angry at Google over AdSense or anything else, don’t let that stop you from trying this amazing free software. You won’t be sorry.

Click here to download Picasa.

You might also be interested in these other resources on WordPlay:

Digg!

Copyright 2008 WordPlayBlog.com


BeFunky-fy Your Blog With BeFunky Free Graphics!

January 5th, 2008 carlajc Posted in Avatars, Blogging, Cartoons, Clip Art, Free Clip Art, Free Graphics, Free Images, Free Online Tools, Free Photos, Free Software, Make Your Own Clip Art, Photography, Reviews, Tips and Tools 4 Comments »

BeFunky — Woody AllenAlthough content really is king, it doesn’t hurt to have your blog look good too. In fact, it can make all the difference in the world when it comes to making readers feel at home.

But if you came to blogging through the wordsmith door and you’re not a designer, you might need a little help when it comes to creating images. WordPlay already offers resources for free photos, free clip art and cartoons, but if you’d really like your blog to stand out, the free BeFunky Web application can help you create free images that are uniquely yours — even if you have no graphics experience at all. You can use these free images in your blog header, in posts and, in some cases for your avatar (depending on the resolution in the image).

The Uvatar maker

BeFunky allows you to create strange and wonderful graphics. They feature two types of image modification applications: a Uvatar maker and a Cartoonizer. An example of a BeFunky uvatar is shown above. As you can see, the application allowed me to capture the moment when Woody Allen joined me at my palace while I was relaxing in my Catwoman outfit. I also made uvatars that chronicled my visits with other celebrities and a furry animal friend, which you can see at the bottom of this post.

The Cartoonizer

Space image before and afterAs fun as the Uvatar app is to play with, the Cartoonizer would probably have even greater use if you’re trying to create images for your blog. All you need is a good image to start with and the Cartoonizer does the rest.

Just upload your photo or clip art and click the SKETCH button. This creates a black and white sketch of your photo. You can adjust the settings on this feature, based on the image you’ve uploaded. Once the sketch is created, click the COLOR button, which takes the colors from your original photo and inserts them behind your sketch.

To the left you can see an original photo of some kind of wild space happening and how it turned out after being run through the Cartoonizer. I also used the same process with a piece of clip art (below) to see how that would work. I suspect this had good results because I used clip art that was originally from a painting and had a lot of detail. But you never know how an image will turn out, so it’s worth a try, even if you only have low-resolution clip art.

Portrait before and after

The original image (left) was used to create a cartoon image, and then had one of many BeFunky borders added.____

As you can see in the sample above with the red curtain, the Cartoonizer allows you to add a border to your image. Many of their borders are geared toward use in e-mail cards, but they can also be used for blog images. The Cartoonizer also gives the ability to warp an image, which can create some pretty strange effects.

So, the next time you want to create an image that’s truly yours, hop on over to BeFunky. You’ll probably have a lot of fun and generate some interesting images at the same time.

My BeFunky Gallery

Snoop Dogg

I tried to convince Snoop Dogg to go roller-blading with me near the canals in Venice, but he told me that tiny wheels scare him. He also was a little leery of the ferret on my head.

____

Halle Berry

Here I am with Halle Berry, trying on dresses to wear to the Oscars. We both feel wearing fur isn’t cool, but that doesn’t apply to live animals, so the ferret stays.

____

Hugh Grant

Hugh Grant has a reputation as a ladies man, so I felt it would be best to supplement the protection provided by the ferret and wear a black shroud on our date at the aquarium.

Go to BeFunky

You might also be interested in these other resources on WordPlay:

Copyright 2008 WordPlayBlog.com


GIFWorks Lets You Create Fun and Easy Avatars

December 26th, 2007 carlajc Posted in Avatars, Blogging, Clip Art, Free Clip Art, Free Graphics, Free Images, Free Online Tools, Free Photos, Free Software, Make Your Own Clip Art, Tips and Tools 1 Comment »

GIFWorksWe’ve already discussed the importance of having a compelling avatar for your blog. Even if you agree it’s a good idea to have an image that represents the true you; it’s easy to put off creating one. You might even be stuck in the mud because you can’t think of an image that would suit you.

Well, this might give you some incentive to move that project to the front burner: There’s a great online application called GIFWorks that allows you to create free graphics you can use as avatars and have a blast while you do it.

GIFWorks is easy to use, even if you have no graphics experience. The only requirement is that you modify a .gif file. (You probably already guessed that from the site name.) It also goes without saying that you have to have permission to use the photo. You can use one of your own, or you can choose one from Stock.Xchng, which offers quality photos for no charge.

There are are a variety of looks that can be obtained through the GIFWorks application. To show you its capabilities, I’ve taken a photo of my nephew and turned it into the following five distinct icons. The GIFWorks features used to create them appear next to each avatar. There are different versions of GIFWorks for Firefox and Internet Explorer (IE), so I’ve included the features paths for each. Click on any of the icons to see the full-size image.

Cartoon sample

_____________

vertical spacerIE: Effects menu /Artist Medium / Cartoon Strip

Firefox: Effects menu / Cartoon Strip_

______

______

Raster avatar sample

__________

vertical spacerIE: Effects menu /Artist Medium / Raster

Firefox: Effects menu / Raster

________

__________________

Colorshift avatar sample

________________

vertical spacerIE: Effects menu /Color / Colorshift

Firefox: Effects menu / Colorshift

________

__________________

Sphere avatar sample

vertical spacer IE: Effects menu /Sharpness / Sharpen/Unsharpen, then Effects menu / Offset / Shadow, then Warp / Sphere

vertical spacerFirefox: All on Effects menu: Sharp/Unsharp, then Shadow, then Sphere_______

______

________________________

3D avatar sample______________

vertical spacerIE: E: Effects menu / Offset / 3D Glasses

Firefox: Effects menu / 3D Glasses___________

____________

___________

These examples (plus many more that didn’t make the final cut) took under an hour — and I had a great time playing while I made them. I hope these inspire you to experiment with GIFWorks and create a little fun of your own!

You might also be interested in these other resources on WordPlay:

Copyright 2007 WordPlayBlog.com