Make Your Own Free Clip Art with Picnik
 As you can probably tell by now, I’m a little obsessed with free clip art. In the past I’ve written about other free graphics programs that can help you turn photos into clip art and do other fun things like make multi-purpose labels and Christmas cards, or create your own cartoons. But I think I might have found the most versatile free tool yet in Picnik. Not only can you alter photos with it, but you also can use their extensive selection of free graphics to make professional quality clip art. Here are some examples of clip art images I created in Picnik in just one afternoon:
 |
 |
 |
 |
 |
 |
 |
 |
Click on the images above to see larger versions. Click here to see more samples of clip art made with Picnik. Also, see our 2008 election clip art made with Picnik.
To make images like these and many others, just follow these simple instructions:
1. To make your own free graphics, you need a file like this one, which is just a 200 pixel x 200 pixel square or this one, which is a 200 pixel x 400 pixel rectangle. Both have white backgrounds. (Because of the backgrounds, these files will seem invisible when you click on them. To download, put your mouse in the upper left corner of the resulting blank screen.) Feel free to use either of these or make your own blanks of any size in Photoshop, Fireworks or any other image program. The reason you begin with a blank slate, so to speak, is because Picnik requires that you upload a file to alter. Most people use Picnik to alter photos, but since you’re going to make your own clip art, you’ll need a white background. You also could use a colored background but for the sake of simplicity, let’s stick to white for now.
2. Once you’ve downloaded a blank .jpg onto your hard drive or created your own, go to Picnik.com and click the “Get Started Now” button.
3. Once inside the program, click the “Upload Photo” button and choose the blank file from your hard drive. When your file has been uploaded into Picnik, you will see it (although barely, because it’s a white image on an almost-white background) in an interface that has five tabs across the top. Choose the “Create” tab.
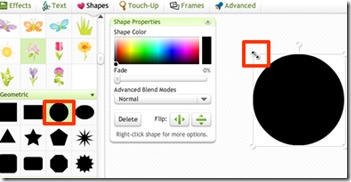 4. Once inside the “Create” tab, the button you will use the most will be “Shapes.” (If you want to add text to your clip art, you’ll also eventually want to use the “Text” button too.) To begin designing your own clip art, choose “Shapes” and then scroll to see all the available images on the left. Keep in mind that all the images in black can be altered to appear in any color, so at this point all you’ll care about is choosing a shape. Click on an image to insert the shape onto your white “canvas” .jpg, then drag the corner with your mouse to make it the size you want. (See the image above.)
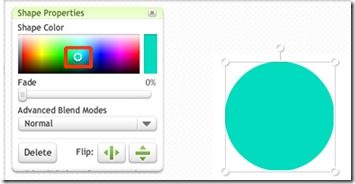
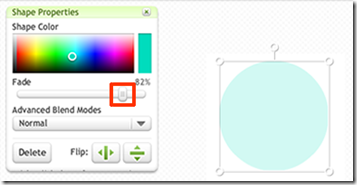
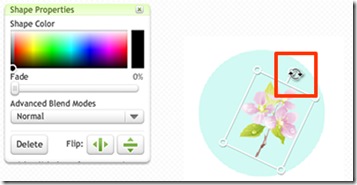
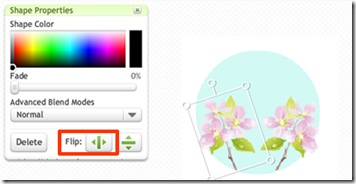
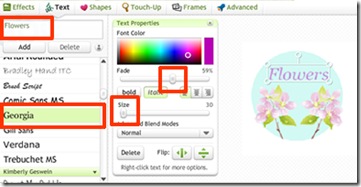
5. There are a variety of Picnik features you can use to alter your clip art. They require a little getting used to, but once you’re familiar, you’ll probably love playing with them. Here are some of the main features:
Once you’re done playing, click the “Save & Share” tab to save, e-mail or post your masterpiece to any number of locations, such as Flickr, MySpace, Facebook or even your own Web site.
If you experiment with the features shown above, you can create some amazing things. And if you need software to edit photos, Picnik can perform that function as well. But that’s a subject for another post!
* Visit Picnik *
You can follow any responses to this entry through the RSS 2.0 feed. Both comments and pings are currently closed.


May 27th, 2008 at 8:28 pm
Sounds like fun. I think i will check it out when I have some free time tomorrow. I can always use stuff like this for my blogs or for printing out.
May 27th, 2008 at 9:47 pm
@ Gizmo: I know you’re going to enjoy it. It’s pretty addictive. Have fun!
May 30th, 2008 at 11:51 pm
ANY tips for how to make a blank jpeg for MAC? My dell is currently broken so I bought a Mac just to hold me over and ITS IMPOSSIBLE! I have loved Picnik for about six months but this is killing me! ( I have photoshop BUT have NO clue how to use it! )
May 31st, 2008 at 12:53 am
Hi, Ashley.
How frustrating that must be!
I don’t use Photoshop (I use Fireworks) and I’m slightly hopeless with the Mac I keep as a spare just-in-case computer, so I can’t help there.
If you can’t use either of the blank files I linked above in paragraph #1 of the instructions, my suggestion would be to find the section of the Photoshop help menu that discusses how to create a file and save it as a jpg. Just follow those instructions, creating a file with a white background. (There’s probably an option in Photoshop to see inches instead of pixels when it comes to sizing it, in case pixels throw you off.) It shouldn’t be too hard to create the file, since all you need to learn are a few steps.
Before you do that, though, are you sure the blank files I provided above won’t do? Just click on one and then right-click when you get to what looks like a blank page. That page will actually contain a .jpg file with a white background, which you can put on your hard drive and then upload to Picnik.
Please let me know if you need any more help.
June 22nd, 2008 at 5:54 pm
this is a great help
June 22nd, 2008 at 6:08 pm
Amari – I’m glad you found the information useful.
August 1st, 2008 at 8:37 pm
How fun… How do I get it?
August 1st, 2008 at 8:51 pm
Hi Sarah. That’s the great thing, you don’t need to get anything; it’s a Web interface. Just click the “Visit Picnik” link at the bottom of the post above to go use their software online. 🙂
December 7th, 2008 at 1:08 pm
Thanks!
January 15th, 2009 at 9:32 am
[…] effects, shapes, and fonts under Picnik’s Create tab. We came across this incredible “Make Your Own Free Clip Art With Picnik” tutorial on WordPlayBlog.com and are still picking our jaws up off the […]
January 27th, 2009 at 8:46 am
Picnik could be a very powerful free tool if you need a few graphics for a new blog or website.
February 1st, 2009 at 6:16 pm
thanks so much for this idea! Great work here thanks a lot
February 2nd, 2009 at 10:35 am
Thanks, Becky. I hope you try Picnik; it’s a lot of fun.
March 17th, 2009 at 1:48 pm
picnik will not let me go on it i have done what it said but still not worked so please email me on how to make it work !
March 17th, 2009 at 4:35 pm
Hi, Holly. I sent you an e-mail. Please leave another comment if you didn’t receive it.
May 14th, 2009 at 2:41 pm
thanks that was super easy.
June 5th, 2009 at 9:08 am
that is a very nice clip art that you have made! : )
June 5th, 2009 at 9:29 am
Thanks, sunshine!
July 29th, 2009 at 5:07 pm
Can I use Picnik to make clipart with a transparent background? I want to create a personal library of clipart with images I already have but I don’t want them to be on a colored, square background. This makes layering them very difficult.
August 3rd, 2009 at 9:02 am
Unfortunately, Picnik doesn’t allow for transparent backgrounds. They might in the future though.
June 12th, 2012 at 10:16 pm
April 19, 2012 – Picnik has closed its doors. Is there any other site that you might recommend to make my own clip art?
June 13th, 2012 at 12:17 pm
Picnik closing its virtual doors was quite a loss for all of us. It’s been absorbed into Google+, though, so some of the features are available there.
As for other sites, I haven’t seen anything that duplicates Picnik’s exact functions, especially the large free image library. But http://pixlr.com/ and http://fotoflexer.com/ have some of the features.
December 9th, 2013 at 10:10 pm
oh I know this photo editor and sadly I know that it is gone, I hope picnik would be back because it so lot of fun to edit there, lot of choices. It’ll be great if picnik would be back.